Running a Club Event
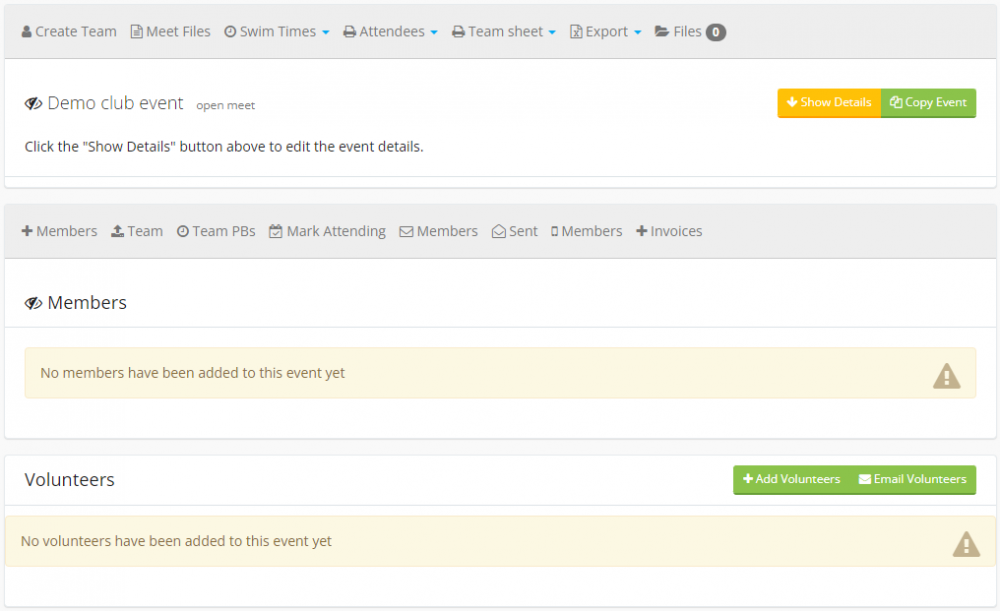
After you have created a club event, you will be taken to the event details page.

There are a couple of ways to add swimmers to a club event. The quickest is to click the "Email Members" link on the 2nd nav bar, and then click the "Select All Eligible Swimmers" check box.
Enter the email subject, reply-to address and enter the email.
There are special email tags you can use. Click the "Insert Tag" link on the editor toolbar.

When you select a tag, at the point of sending the email, the system will replace the tag with the actual information. For example, the "First Name" tag will be replaced with the recipient's first name.
Once you have entered the email body, make sure the "Include link to confirm" option is selected. Each email will contain a special link for the swimmer to click on, which will take them to a page listing the event details, along with the events they qualify for.
Depending on what you selected for the "Event Type" option when creating the event, the swimmers will either be able to select the events they would like to swim or say whether they can or can't attend.
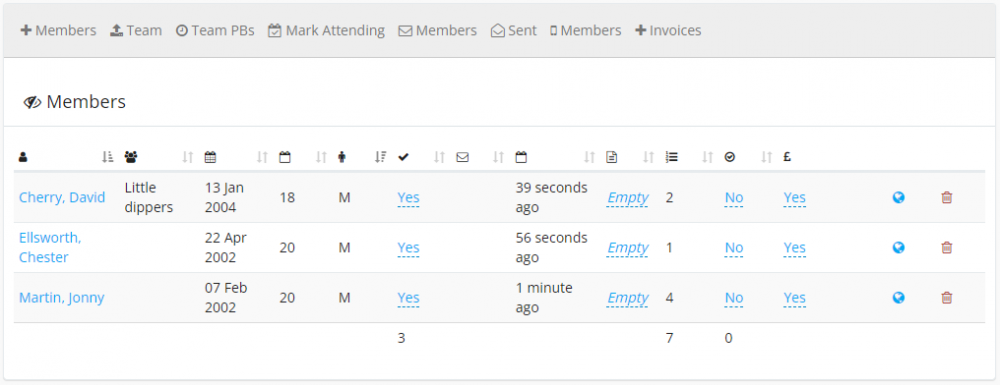
When some swimmers have selected their events or confirmed their attendance, they will be listed in the "Members" section.

If the event type is either "Open Meet" or "Club Champs", the swimmers that selected events will also be listed on the "Create Team" page, under the events they selected.
Click the "Create Team" link to view and manage the team.

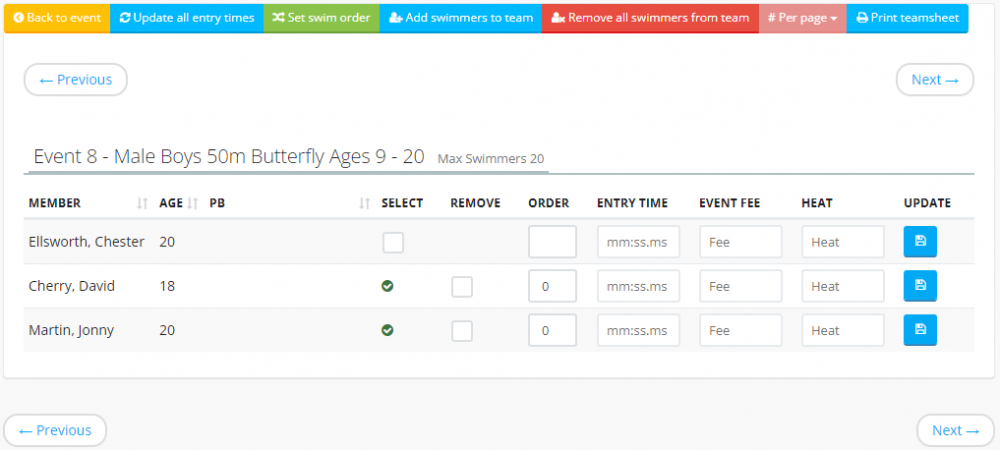
There are various buttons and features on this page.
Update All Entry Times
If you click this, the system will update all of the team entry times with their latest PBs. This is useful if they have swum at an event before this one and have swum some better times since they were added to this event.
Set Swim Order
Clicking this option will automatically set the swim order for every event (except relays). The swim order will be set to entry time (slowest first), then pb (slowest first) then age (youngest first).
Add Swimmers To Team
Clicking this will allow you to manually add swimmers to events. Note: The swimmers have to have already been added to the event (either by them confirming attendance, or you adding them on the event details page), ad set to be "Attending" or they will not show up here.
Remove All Swimmers From Team
Clicking this will remove all swimmers from the team.
Per Page
You can set how many events per page you would like to see.
Print Teamsheet
Clicking this shows you a printable version of the teamsheet, with links to download the "Starts List".
The table for each event on this page contains the following columns:
Member
This is the swimmer's name
Age
This is their age, using the "Age on Date" of the event, or today's date if not set.
Select
To select a swimmer for this specific event, click the "Select" check box, complete the other fields (listed below), and then click the blue "Update" button.
Remove
To remove a swimmer from this specific event, check the "Remove" option, and then click the blue "Update" button.
Order
Use this column to set the swim order.
Entry Time
Enter the swimmer's entry time in mm:ss.ms format.
Event Fee
If you want to override the default event fee, enter an amount here.
Heat
Set the heat information here, if applicable.
Once you have created the team and checked all the correct swimmers are in the correct events, click the "Back to event" button.
To edit the event details, click on the orange "Show Details" button. Make your amendments, then click the "Update Event" button at the bottom.
There are two menus on the event details page with the following links on them:
Menu 1
Create Team - As mentioned above
Meet Files - This allows you to download the meet files. This contains a zip file with various files such as a CSV file with all the events and swimmers, an import template for importing the results after the event and a SportSys consolidated entry file for importing into SportSystems.
Swim Times - This is a drop-down menu containing the following options:
Add Swim Times
Import Swim Times
View Swim Times
Export Swim Times (CSV)
Export Swim Times )XLS)
DELETE All Event Swim Times
Attendees - This is a drop-down menu containing the following options:
With Medical Details - A printable page of attendees containing their medical details
Without Medical Details - As above but without the swimmer's medical details included
Team Sheet - This is a drop-down menu containing the following options:
Non-formal Names - Uses the swimmer's "Known As" field instead of first name
Formal Names - Uses the swimmer's First and Last name
Volunteers - Print out the volunteers
Export - This is a drop-down menu containing the following options:
Eligibility Report - Run this report to receive an Excel file containing all the events, and each swimmer that qualifies for them, along with their PBs etc
Event Entries Report - A PDF containing all the entries
Open Meet Performance Sheet - Allows you to compare the swimmers against up to 4 qualifying time groups
Swimmers by event
Swimmers by swimmer
Files - This allows you to upload and assign files to the event.
Menu 2
Add Members - This allows you to add members to the event manually.
Import Team - This allows you to import a team from a past event. Note: this will remove ALL current members and then copy the members from the event you select.
Team PBs - This allows you to see all of the swimmer's PBs.
Mark Attending - Clicking this will mark ALL of the members added to the event as "Attending".
Email Members - This allows you to email your members about the event.
Email Sent - This shows you emails you have sent out regarding this event, and whether they responded to the email or not.
Text Members - This allows you to send a text message (SMS) to your members about the event.
Add Invoices - This allows you to invoice all swimmers in the team. Each member in the team will receive 1 invoice listing the events they are swimming.
The members table contains relevant information about each member, including their club groups, DOB and age, gender, emailed, responded, notes, no of events, entry form received, receive invoice and the link to their confirm page.
Clicking the globe icon on one of the member rows will take you to the exact page the member sees when they click on the confirm link in the email you send. This is useful for quickly checking if a member can see the correct events, or selecting their events for them etc.
Before you can add volunteers, you need to assign a volunteer template. To create a volunteer template, go to "Setup > Club > Volunteer Templates".
Once created, edit the event details and select the relevant template.
Click the "Add Volunteers" button.

You will see a list of the roles on your volunteer template, and a drop-down allowing you to select who you would like to volunteer for each role.
Make your selections and then click the "Add Volunteers" button.
To email the volunteers, click the "Email Volunteers" button.
Once the event has finished, you can add your swim times. You can do this in a couple of ways:
Manually
Click "Swim Times > Add Swim Times" on the top menu. Your events will be listed one by one allowing you to type in the swim time for each swimmer.
Import
The quickest way is to use the import template. Click the "Meet Files" link, enter your club code and select the Male and Female options, and whether to include the swimmers SE number, then click the "Export Meet Files" button.
Open the zip file that downloads and the import template is called X-Resuts.xls. Enter the results in this spreadsheet, then go to "Swim Times > Import Swim Times" on the top menu and upload it when prompted.

